Sunday, August 29, 2010

Spring Bargello borders done

Good idea………… leave all those dreaded jobs for when a friend comes over to quilt with you. Had Karin over on Friday night to help me stay awake and we started quilting at 7pm and worked right through the night until 5 am the Saturday morning and yes, I got all those appliqué motifs satin stitched to the background. Even with her here it didn’t make me enjoy the process more, so we took plenty of breaks watching quilt videos on QNN TV and got plenty of tips and saw pretty cool things. However watching these made us realize just how deprived South African quilters are, we get to see so much but get so little over here. Luckily we have people like Kelly from IHAN not scared to send her stock anywhere in the world.


The next step was to put some emphasis on my appliqué motifs with trapunto. I simply spray basted (505 Spray adhesive) a batting strip behind the appliqué motifs and then used monofilament thread on top to stitch as close to the motifs as I could.


Before cutting the batting away and with the comfort of still having the strips separated from the top I’ve added some decorative free-motion stitching to the appliqué motifs with Catsidy keeping a watchful eye on my work.
Spray basting turned out to be a very bad idea as I had a hard time separating the batting from the fabric especially in the smaller areas where I did the stitching and I ended up snipping through my top fabric. See where the tip of the scissors disappears in the fabric. I then had to cut, iron and satin stitch 4 more leaves to make both borders look the same.

With the batting cut away it is finally time to trim the borders to size and add these to the quilt top.

File cover tutorial

On Wednesday morning we had our very first meeting for our National Quilt Festival held here in Bloemfontein in 2013. Festival coordinator, Iessie, scheduled meetings with every responsible group and being involved in 3 different groups (treasury, goodie bags & accommodation) I sat there from 9 am with just the company changing occasionally. When it was friend Karin’s turn to join me she noticed Iessie’s fabric covered file and loved it, insisting that WE (I simply have to get just as excited whether I want to or not) must make these too. I searched the internet for a quick tutorial but couldn’t find anything, so here goes my take on this.
Trace the outlines of your file on paper then adding and marking a quarter inch seam allowance to the long sides on the top and bottom for the binding and a half an inch to the shorter left and right sides. This allows for space when the file is closed and the quarter inch for the binding. I also marked the middle panel on my paper pattern.

I cut a double layer of fabric somewhat larger than my pattern as I wanted to quilt the cover. The quilting however can be omitted. I did all-over quilting first in a variegated purple thread and then echoed these with a variegated green. When not quilting (or when done quilting), you can cut the fabric the size of your paper pattern. I marked the cover with all the seam lines as well as the middle panel to make placement of the outside pocket easier.


I selected a novelty print for the outside front pocket and quilted this too before adding a quarter inch binding around the edges. The pocket was stitched in the ditch where the binding was stitched on.  I also added a magnetic fastener for the pocket to close but this too can be skipped.


For the size of the inside flaps I marked in 9 inches from the short side of my paper pattern. You can make these as wide or as narrow as you want but if much wider you might have to fold the file sides all the way to the back to be able to get the cover over. Cut 2 in fabric. Mark a quarter inch on one long side of each flap.

Iron a fold on the line folding fabric wrong sides together to create a quarter inch seam then fold over once more and stitch this seam. (The flaps are still not stitched to the main cover).


Then you need to decide what (and if) you want to add to the inside flaps. I decided on an elastic strip to hold pens and a smaller pocket.


I drew a pattern for the pocket – mine was a 5 inch square and cut 2 layers from my selection for the pocket fabric the size of the paper pattern.


I stitched around 3 sides of the square right sides together then turning it inside out and then marked the bottom edge of this pocket placement on the inside front flap.


The open edge of the pocket is placed on the marked line for the bottom of the pocket and then stitched down – this might look upside down but it should be this way. Then fold the pocket up onto the inside flap and topstitch around the 3 sides leaving the top open.


You can further decide to add or skip a top flap for the pocket. I drew the closing flap on my pattern then just added quarter inch seam allowance, cut 2 layers of fabric, placed wrong sides together stitched around all the edges except the long edge turned right side out and stitched in similar fashion as the pocket by first placing it with the raw edges towards the pocket, stitched a quarter inch from this edge after which I folded it back onto the pocket and topstitched it.


Iessie – the one by whom we saw the file cover – also had a pocket in her back flap and she warned that this was totally useless unless you wanted to hide money from your husband in it. So seeing that I made this cover for Karin I decided to add a rather big pocket and have Velcro to secure the open end – we don’t want her hidden money to lose now, do we?

Once everything you wanted on the inside flaps are stitched down you can simply place these on top of the cover matching raw edges and stay stitch them in place before adding the final binding all around the outside edges of the file.


This is what the end product looks like.


Saturday, August 28, 2010

Sorting my space

I’m expecting plenty of new fabric but more about that later. In the mean time I’ve decided I needed to organize my sewing space as I never seem to have enough storage (nothing new for any quilter I suppose) but I have this memory problem……………….. if a certain ruler was in a certain drawer for x amount of time, I dare not move it or I will never find it again – not even if I moved it to the ruler rack. I will simply expect to find it where it has been from the start and boy if you want to see a tantrum, watch me open that drawer, NOT to find my ruler. Obviously the kids……… who else could it be? The main reason for this blog entry therefore is to allow me to get back to it and read where I put what!! Maybe it might also serve as an inspiration to someone out there? So this started out as my fat quarter drawers arranged by colour.

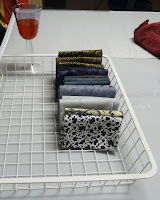
However when looking for a couple of fat quarters earlier I saw that I have lots of other sizes in these drawers and got really frustrated when I would just find the perfect colour and then realize it was not big enough. So while DH watched rugby on TV I repacked these – fat quarters or slightly bigger ONLY!! Every single piece of fabric was unfolded to check for size then neatly pressed, folded and packed back into the drawer.

Why o why would one do this???

Celebrating drawer 1 (black and gray) – this can become a fun affair but o dear, how empty the drawer looks. Major shopping to do!!

Too much wasted space per drawer so I decided to share colours in a single drawer – creating space and obviously celebrating drawer 1 AGAIN. Headache…. here we come!

I found heaps of fat quarters with cuts like these – not staying in the drawers any longer.


Couldn’t finish so with a throbbing head I continued the next day and wha-la…. all done leaving me with no less than 8 empty drawers and in defence of my small amounts per colour in each drawer the pile in the background (excluding the black cat) are lengths from 1 yard or more. Need to find another space for these.


Those unfortunate ‘idols’ who didn’t make it to either of these groups found their way to yet another set of colour coded drawers for remnants/scraps. Looking at the drawer containing the blues these are one big mess but I dig through these daily and have no intention of reorganizing them.

Thursday, August 19, 2010

QU Spring Bargello

After doing a Bargello course through Quilt University, I’ve only managed to do the very first (Spring) of the 4 quilts presented in the course and am now in the process of cutting out heaps of petite flower and leaf motifs to decorate the top and bottom border – the only 2 sides too short to cover a double bed. I am really not fond of machine appliqué or then satin stitching around a motif. What can be more boring than having to feed fabric through a machine watching the needle do the same thing over…. and over… and over again? Even blogging about it seemed much more exciting than actually getting on with the job!!


However……………. I do think this might end up looking really nice, that’s now once I actually do get it finished.

Saturday, August 14, 2010

Oranje Quilters Guild August 2010 quarterly meeting

I was so fortunate to be invited to speak at our local guild meeting and with such clever ladies around me I knew that I could teach them very little so I used this opportunity to share with them other people’s talents and their incredible creations via the internet.

First up was obviously free-motion quilting, being the nicest part of the quilting experience to me. After discovering the videos on Daystyledesigns there was no stopping me and watching Leah and listening to her calm voice, making everything sound just so easy, my confidence grew. So this was just something I couldn’t keep to myself and needless to say the other ladies were equally impressed by this site and I am sure Leah’s visitor count has already grown in number. Thanks Leah for all the trouble you go through to help all of us right on the other side of the world.

Then after making Scrappy Dee Scrappy Doo I found the books from Alicia’s Attic and just loved all the possibilities one can get when using triangles as a start-off point. I completed 2 quilts from my first book purchase and could then share their website, tools and books with the rest of our guild with the promise of many more quilts from these books to come. After initially only buying 2 books, I have ordered their brand new publication ABC 3-D Tumbling Blocks…. and more and cannot wait for them to send it with the release end August. I will then be the proud owner of no less than 5 of their publications. Will I live long enough to make all the nice things I see??

Tiny Hex from the book
Doubledepity, more serendipity quilts
Tiny Sparkle from the same book


The ladies thanked me (sorry Leah, Marci and the staff at Alicia’s Attic not sharing this with you) with a lovely bottle of wine in the neatest wine bottle cover I’ve ever seen – even with my name personalized on it. How important I feel!!!!
WOW!! How lucky can one get??